Shooting RAW
When I first thought about buying a DSLR camera I had never heard of the term “RAW”. I just assumed all cameras shot JPG files and that was it. While researching camera models and learning more about editing software I learned about RAW and it’s advantages.
First, let me explain what RAW means. By setting the camera to shoot RAW photos, all of the image information captured by the sensor is saved to the file. That’s it. The camera does nothing else to that file. Once the file is copied to a computer, software is required to read the file and process it. On the other hand, when the camera is set to shoot JPGs, the information captured by the image sensor is then compressed into the JPG file. As it compresses the information, the processor in the camera applies sharpening, contrast, saturation, white balance, etc. to the image and then discards any extra information which helps it reduce the file size. One obvious difference then when shooting RAW versus JPG is the file size. RAW files are not compressed like a JPG, so they will be larger files.
While, the RAW file size may seem like a disadvantage, that is also its greatest advantage over the JPG. Because the extra image data hasn’t been discarded, there is much greater flexibility for editing the image using software. I find that no matter how advanced the camera technology is, the camera still gets it wrong sometimes. While you can edit a JPG file, the image quality begins to degrade as you make changes to settings like exposure and white balance because there is no data to work with. For example, if a photo is underexposed, the RAW file still contains the information about what is in the darker areas of the photo and they can be brightened up. In a JPG, those darker areas are just dark and you are basically trying to brighten up something that just isn’t there. As a result, the image quality goes downhill quickly.
In order to process RAW image files, you will need software like Apple Aperture, Adobe Photoshop Lightroom, Photoshop, Photoshop Elements, etc. All of these will handle JPG files too, so don’t think you only have to shoot RAW in order to use one of these programs. I personally feel that everyone should use some type of photo editing software anyway, even if its just to get rid of red eyes. Once the RAW photos are edited, they can be exported as JPG files for emailing, posting on the web, printing, or whatever.
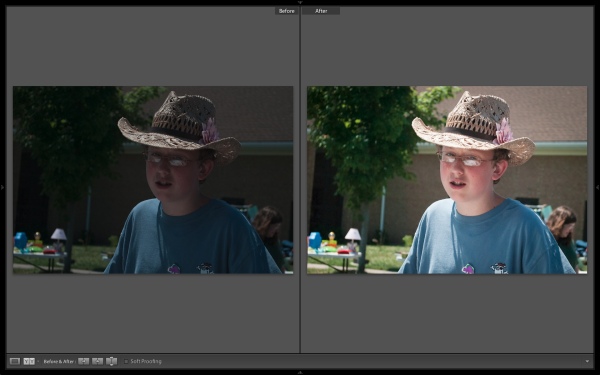
Here are a few examples in which I was able to take advantage of the RAW image while editing them using Lightroom 4. The before image on the left is straight out of the camera with no editing done at all. These were all taken with a Nikon D60.
You can see that this first image was a really poor exposure. My kids were using the camera and accidentally switched it to Manual instead of Aperture Priority. The manual setting was f5.6 1/4000 ISO 400 so the picture ended up quite underexposed. I actually increased the exposure by 2.5 stops. Normally, I don’t get this bad of an underexposure myself, but this is a nice example of what you can recover with the RAW file. Increasing the exposure this much does result in a bit more noise, but with some extra noise reduction, you can counteract that.
This image below is a good example of adjusting the white balance of the RAW file. It was shot with Auto White Balance, but you can see that the before shot has a bit of an orange/yellow color cast to it. This a typical result when shooting indoors with some type of artificial lighting. I cooled off the white balance and reduced the orange and yellow saturation levels a bit to get a more normal looking color. This produces better skin tones as well as more accurately depicting the colors in the scene. Take a look at the white trim around the windows and the white radiator in the background. You can see how they actually look more white now also, instead of a yellowy white.
This last shot was just “okay” out of the camera, but by bumping up the shadows and increasing the saturation of the sky and grass (increased the blue and green saturation levels), it’s a better photo.
I encourage you to try shooting RAW photos if your camera can support it. Almost every DSLR camera these days can shoot RAW files. Some of the more advanced point and shoot cameras can even shoot RAW. Give it a try and have fun editing the photos!


Radical! New content! You’ve obviously been working on your writing skills. Bravo 🙂 Thank you so much for the genius of well – you!
I’m with you on RAW my friend. Nice article with lots of clarity on the benefits. Well done!
Thanks Heather! This post started out as an email to a friend of mine that I have been helping to learn more about photography. I figured that others might benefit from it so I expanded on it a bit for the blog.